You’ve been growing veg for a year or two, and things started well. Great tomatoes the first summer, decent beans, the carrots were passable. But now the same bed where the tomatoes thrived is producing disappointing plants with yellowing leaves, and the carrots are riddled with root fly despite doing nothing different. What changed? Nothing — and that’s exactly the problem.
Growing the same crops in the same spot year after year is like eating only beige food. It works for a while, then everything starts going wrong. Crop rotation — moving plant families to different beds each year — is the oldest trick in gardening, and it works because the science behind it is rock solid. Here’s a simple four-year plan that any UK gardener can follow, whether you’ve got an allotment, a back garden, or a few raised beds.
In This Article
- Why Crop Rotation Works
- The Four Plant Families You Need to Know
- The Simple Four-Year Rotation Plan
- Year 1: Legumes and Pods
- Year 2: Brassicas
- Year 3: Roots and Alliums
- Year 4: Potatoes and Nightshades
- Setting Up Your Beds for Rotation
- What About Permanent Crops?
- Common Rotation Mistakes
- Adapting Rotation for Small Gardens
- When to Break the Rules
- Bottom Line
- Frequently Asked Questions
Why Crop Rotation Works
Crop rotation isn’t some mystical gardening ritual — it’s applied biology. Three things happen when you grow the same crop in the same spot repeatedly:
Soil-Borne Diseases Build Up
Clubroot in brassicas, white rot in onions, blight in potatoes — these pathogens live in the soil and multiply when their host plant appears in the same spot year after year. Clubroot spores can survive in soil for 20 years. Once established, your only option is to stop growing brassicas there entirely. Rotation starves these pathogens by removing their host.
Pest Populations Establish
Carrot fly, cabbage root fly, and onion fly all overwinter in the soil as pupae. They emerge in spring exactly where last year’s host plants were. Moving the crop to a different bed means the emerging pests have to find their host — and many don’t.
Nutrient Depletion
Different crops take different nutrients from the soil. Brassicas are heavy nitrogen feeders. Roots need potassium. Growing the same thing repeatedly drains specific nutrients while leaving others unused. Rotation balances the draw across the whole plot.
For more on why this matters, our crop rotation introduction covers the science in more depth. This article focuses on the practical plan — what goes where and when.
The Four Plant Families You Need to Know
The rotation is built around four plant families. Everything you grow in a UK vegetable garden falls into one of these groups:
Group 1: Legumes (Peas and Beans)
- Peas (garden peas, sugar snaps, mangetout)
- Beans (runner beans, French beans, broad beans)
- Green manures (clover, field beans — if you use them)
Why they go first: Legumes fix nitrogen from the air into the soil through bacteria in their root nodules. When you dig in the roots after harvest, they leave behind nitrogen-enriched soil for the next crop.
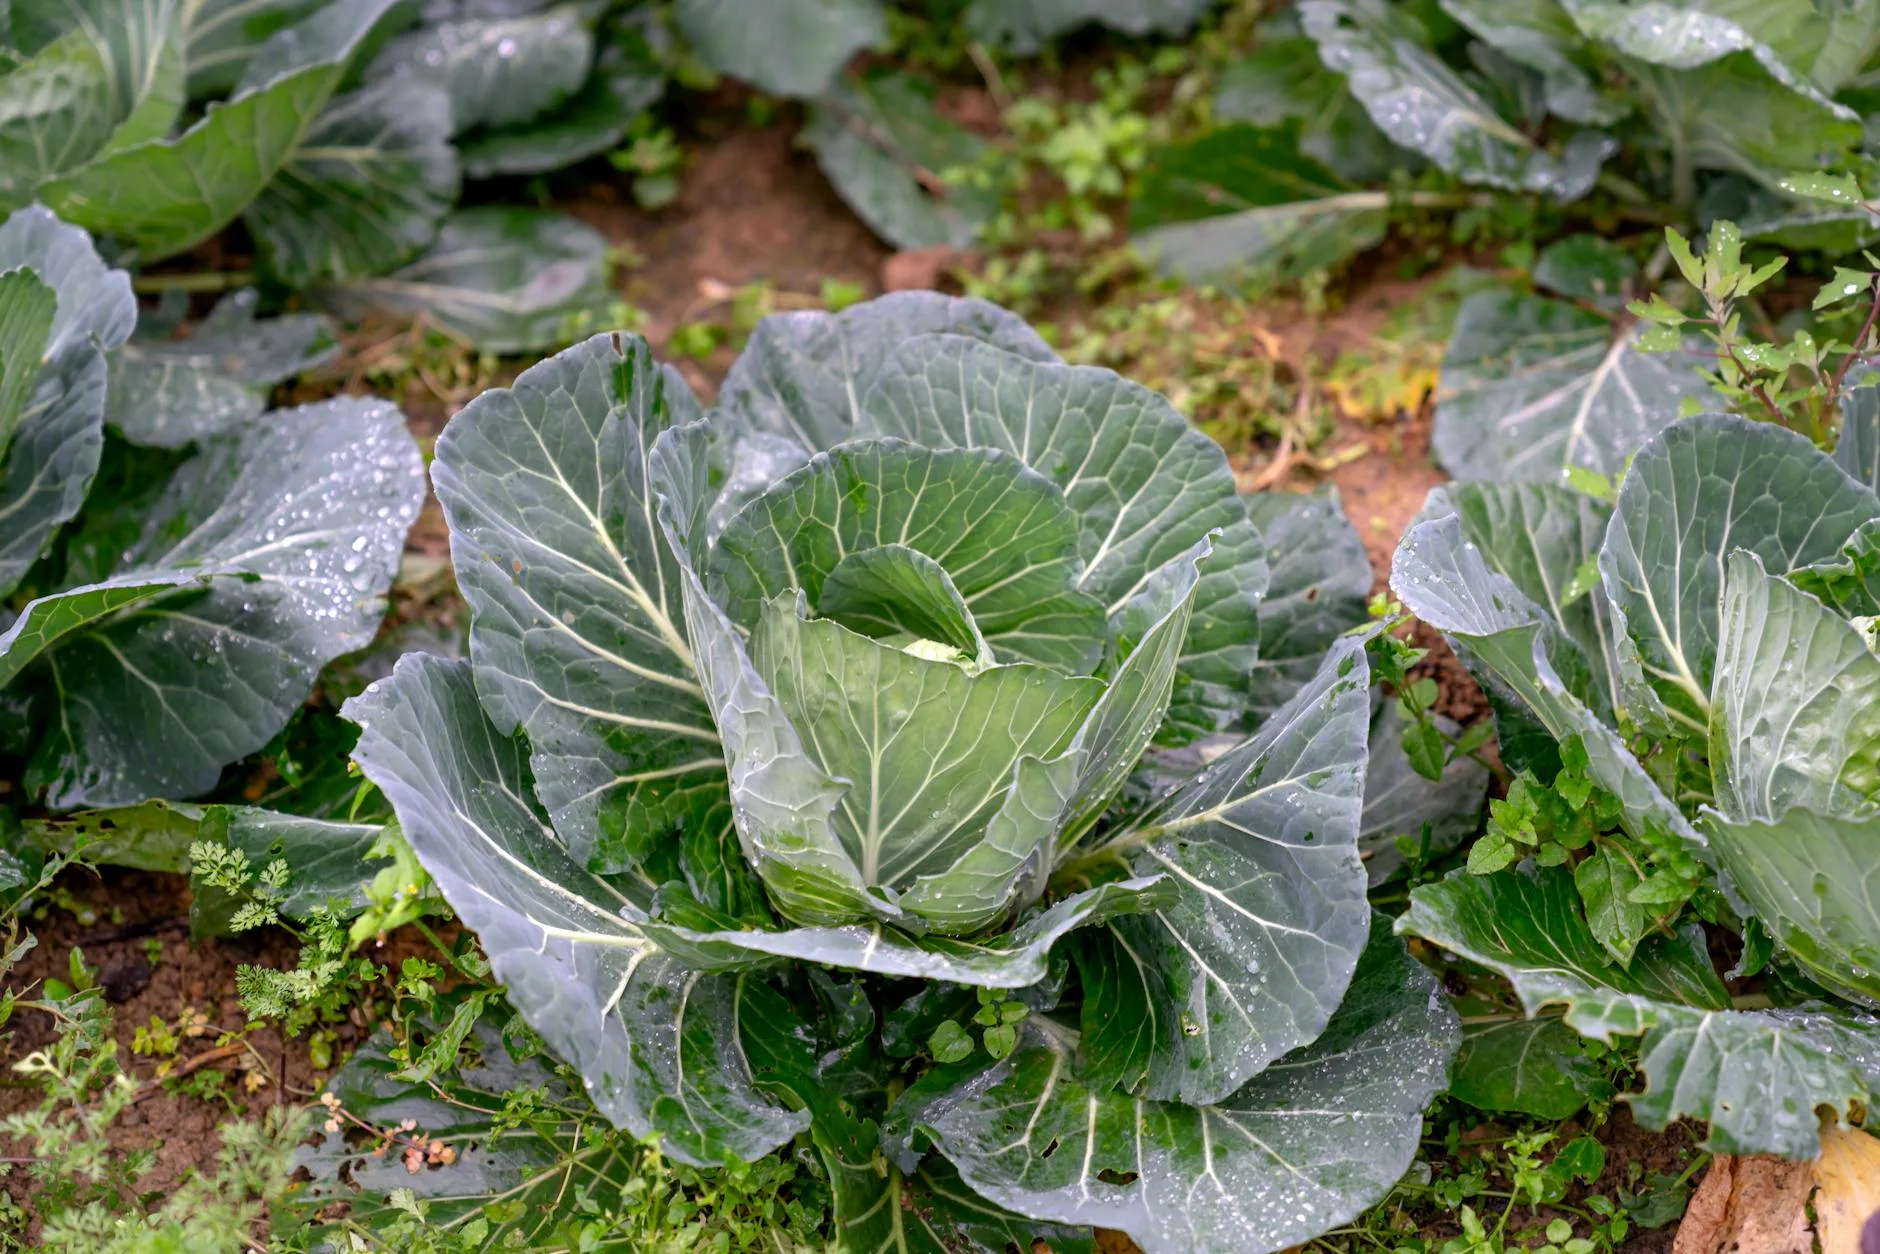
Group 2: Brassicas (Cabbage Family)
- Cabbage, cauliflower, broccoli, Brussels sprouts
- Kale, pak choi, kohlrabi
- Turnips, swede, radish (yes, these are brassicas, not roots)
- Rocket (also a brassica)
Why they follow legumes: Brassicas are the hungriest nitrogen feeders in the garden. They thrive in the nitrogen-rich soil left behind by the previous year’s legumes.
Group 3: Roots and Alliums
- Carrots, parsnips, beetroot, celeriac
- Onions, garlic, leeks, shallots
- Celery
Why they follow brassicas: Roots prefer soil that hasn’t been freshly manured — it causes them to fork. The brassicas used up the heavy feeding, leaving soil that’s settled and suitable for straight root growth.
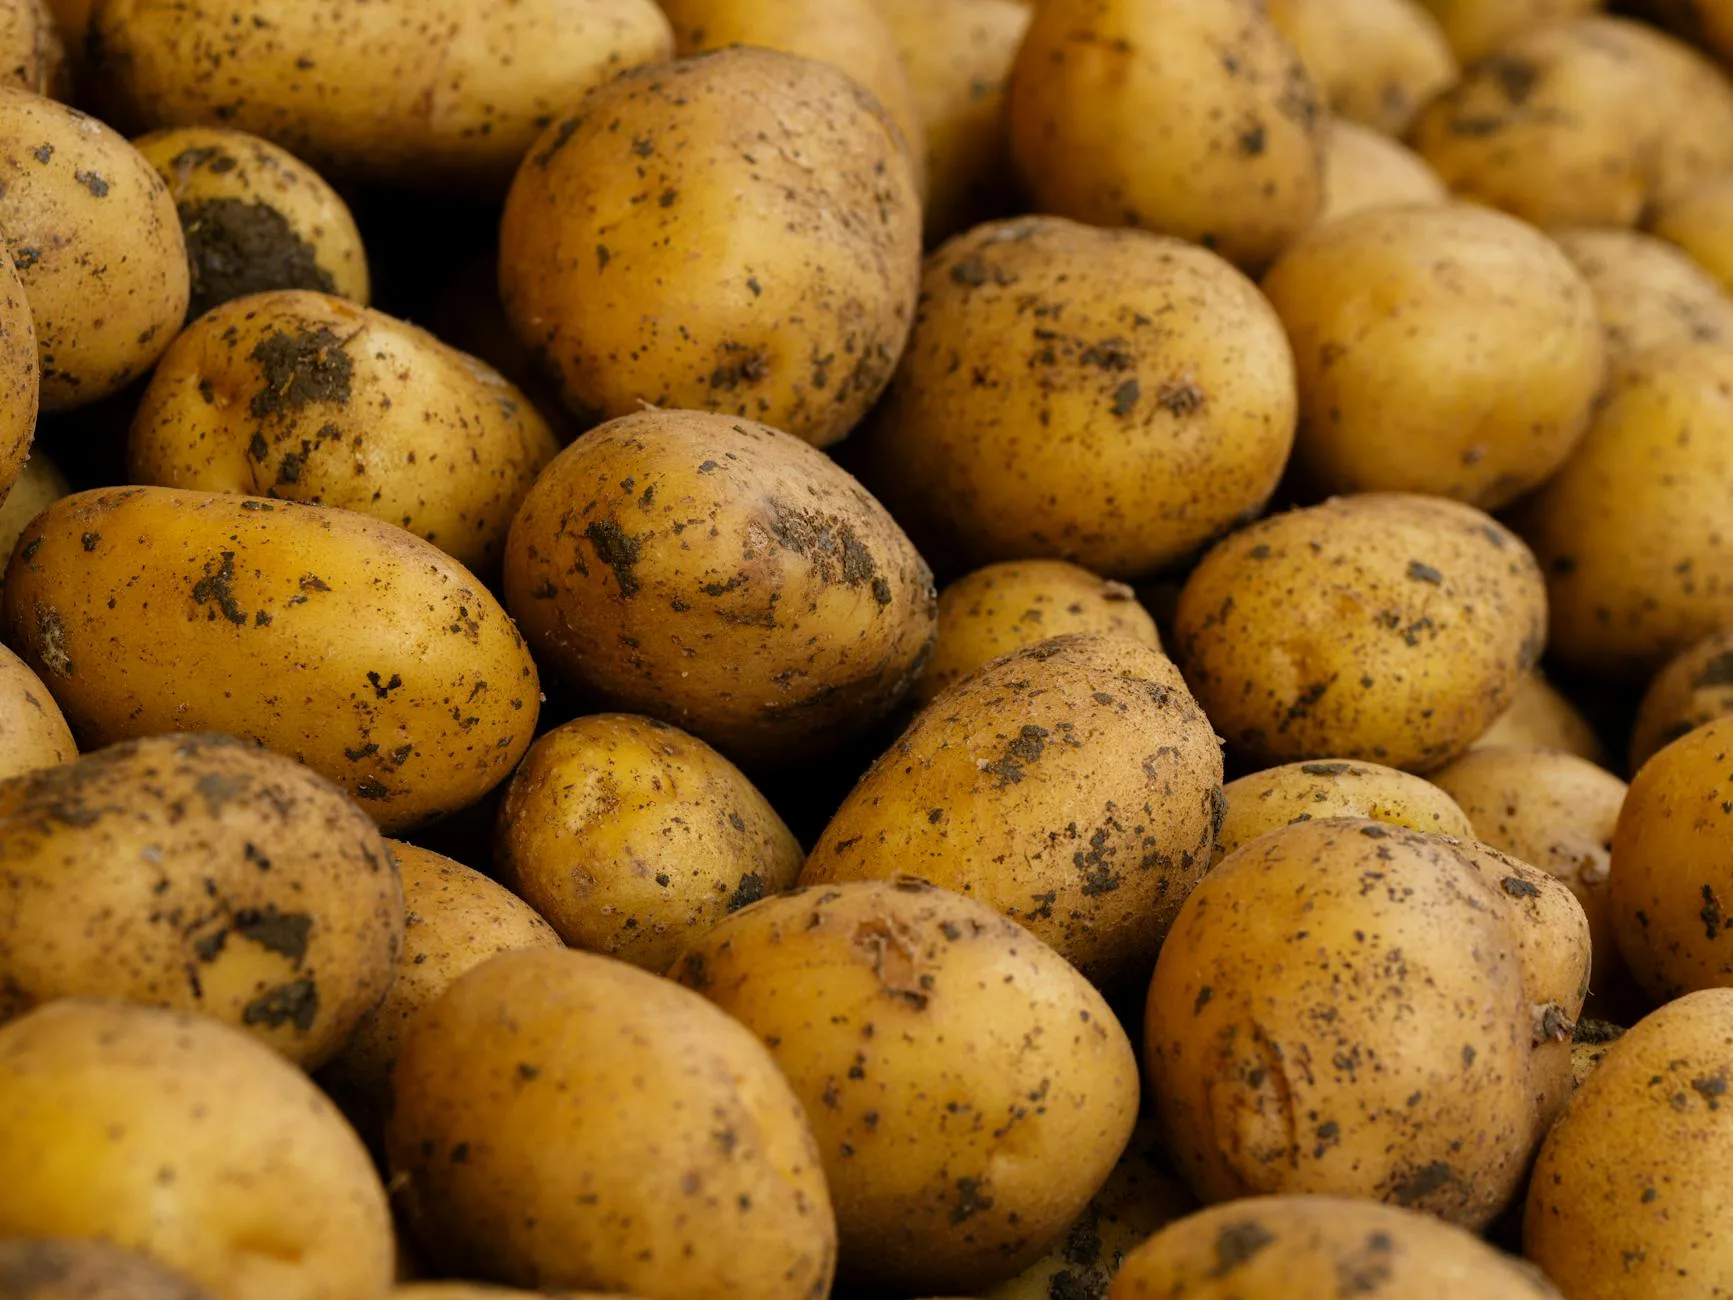
Group 4: Potatoes and Nightshades
- Potatoes (first earlies, second earlies, maincrop)
- Tomatoes (outdoor and greenhouse — though greenhouse tomatoes often stay put)
- Peppers, chillies, aubergines (if you grow them outdoors)
- Courgettes, squash, pumpkins, cucumbers (cucurbits — technically a separate family but grouped here for simplicity)
Why they go last: Potato planting involves heavy digging and earthing up, which breaks up compacted soil. Adding manure or compost at this stage replenishes what the previous three years depleted, resetting the cycle.
The Simple Four-Year Rotation Plan
Divide your growing space into four equal sections — beds, rows, or quarters of an allotment. Label them A, B, C, and D. Then follow this rotation:
The Pattern
- Bed A: Year 1 Legumes → Year 2 Brassicas → Year 3 Roots → Year 4 Potatoes
- Bed B: Year 1 Brassicas → Year 2 Roots → Year 3 Potatoes → Year 4 Legumes
- Bed C: Year 1 Roots → Year 2 Potatoes → Year 3 Legumes → Year 4 Brassicas
- Bed D: Year 1 Potatoes → Year 2 Legumes → Year 3 Roots → Year 4 Brassicas… wait.
Actually, let’s keep it simpler. Each bed moves through the same sequence, just starting at a different point:
Legumes → Brassicas → Roots → Potatoes → back to Legumes
In any given year, all four groups are growing somewhere on your plot. After four years, every bed has hosted every group once. Then it starts again.
Year 1: Legumes and Pods
What to Grow
- Broad beans — sow October-November or February-March. The easiest legume in the UK, almost impossible to fail.
- Runner beans — sow May-June direct or start indoors April. The classic allotment crop, productive from July to October.
- French beans — sow May-June. More compact than runners, excellent in smaller spaces.
- Peas — sow March-June in succession for continuous harvesting. Go for Kelvedon Wonder (reliable) or Hurst Green Shaft (heavy cropping).
- Sugar snap peas — same timing as garden peas. Eat the whole pod.
Soil Preparation
Dig in well-rotted manure or compost the previous autumn. Legumes don’t need much feeding once planted — the nitrogen fixation handles that — but they want moisture-retentive soil.
After Harvest
Cut the plants at ground level but leave the roots in the soil. This is the key step that makes rotation work. The nitrogen-fixing nodules on the roots decompose over winter, releasing nitrogen for next year’s brassicas.
Companion Planting
Interplant with lettuce, spinach, or radishes between rows. These fast-growing crops use space that would otherwise grow weeds and are harvested before the legumes need the room.
Year 2: Brassicas
What to Grow
- Calabrese/broccoli — sow April-May, harvest summer. Purple sprouting broccoli sown in spring provides harvests the following February-April.
- Cabbage — sow February (summer varieties) or May (winter varieties). Savoy types are the hardiest for UK winters.
- Kale — sow April-June. Cavolo nero and curly kale are the staples. Hardy enough to stand through UK winters without protection.
- Brussels sprouts — sow February-March indoors. Long growing season but worth it for Christmas dinner from the garden.
- Cauliflower — sow February-April. The trickiest brassica — needs consistent moisture and nutrition. Not one for beginners.
Soil Preparation
This bed had legumes last year, so nitrogen levels should be good. Add a balanced general fertiliser (Growmore or blood, fish and bone) at planting time. Net against pigeons from the moment you plant out — they will strip brassicas overnight. For a related angle, see our Best Fruit Cages 2026 UK: Protect Your Crop guide.
Pest Prevention
The rotation helps with clubroot and cabbage root fly, but brassicas still need physical barriers. Fine mesh netting (Enviromesh or similar) keeps cabbage white butterflies and root fly off your plants. Worth every penny.
The RHS recommends netting brassicas immediately after planting and keeping it on until harvest — even a few hours of exposure gives butterflies enough time to lay eggs.
After Harvest
Remove all brassica stumps and roots — don’t leave them to decompose in situ. Brassica roots can harbour clubroot, and composting them doesn’t always kill the spores. Bin them or burn them.
Year 3: Roots and Alliums
What to Grow
- Carrots — sow March-July in succession. Avoid freshly manured soil (causes forking). Nantes and Chantenay varieties are reliable in UK clay.
- Parsnips — sow February-April. Slow to germinate (3-4 weeks) but worth the patience. Sweeter after the first frost.
- Beetroot — sow April-July. Bolt-resistant varieties like Boltardy live up to their name. Harvest golf-ball to tennis-ball size.
- Onions — plant sets in March-April or September-October. Easier from sets than seed for beginners.
- Garlic — plant cloves October-November. Needs a cold period to develop properly. Elephant garlic if you want the wow factor.
- Leeks — sow February-March, transplant June. Drop them into deep holes and let rain fill them in. The easiest allium.
Soil Preparation
Don’t add fresh manure — it causes roots to fork and split. The residual fertility from two years of manure (legume year) and fertiliser (brassica year) is enough. A light application of wood ash (potassium) benefits root development.
After Harvest
Clear all crop debris. This bed will receive heavy manure or compost over winter, ready for next year’s potatoes.
Year 4: Potatoes and Nightshades
What to Grow
- First early potatoes — plant late March, harvest June-July. Varieties: Swift, Rocket, or Casablanca.
- Second early potatoes — plant early April, harvest July-August. Varieties: Charlotte, Kestrel.
- Maincrop potatoes — plant mid-April, harvest September-October. Varieties: Maris Piper, King Edward, Roosters.
- Courgettes — sow April indoors, plant out late May. Two plants feed a family. Three plants and you’re leaving courgettes on neighbours’ doorsteps.
- Squash and pumpkins — sow April, plant out late May. Need space — trail them along edges or grow vertically.
Soil Preparation
Dig in a thick layer of well-rotted manure or compost over winter. Potatoes are heavy feeders and benefit from rich, loose soil. The act of digging, earthing up, and harvesting potatoes breaks up compacted soil, improving structure for next year’s legumes.
Earthing Up
When potato shoots reach 15-20cm, draw soil up around the stems to cover the lower leaves. This prevents tubers turning green (toxic) and encourages more tubers to form. Repeat two or three times through the growing season.
After Harvest
The bed is now ready to restart the cycle with legumes. The heavy digging from potato harvesting has aerated the soil, and the manure has restored fertility. If you want to start our guide on starting a vegetable garden from scratch, potatoes are often the recommended first crop precisely because they break up virgin soil.
Setting Up Your Beds for Rotation
Allotment Layout
A standard 10-rod allotment (250 square metres) divides naturally into four beds of about 60 square metres each, with paths between. That’s plenty of space for a productive rotation.
Raised Beds
If you garden in raised beds, four beds of 1.2m × 2.4m each gives you a functional rotation on a modest patio or back garden. Smaller than ideal for potatoes, but manageable. Our How to Grow Salad Leaves Year-Round in the UK guide is useful alongside this.
Labelling
This sounds tedious but it saves confusion: label each bed and keep a notebook or phone note of what went where. By year 3, you will not remember what was in bed C two years ago. Write it down.
What About Permanent Crops?
Some crops don’t rotate. Give them dedicated permanent spots outside the rotation:
- Fruit bushes and canes — gooseberries, blackcurrants, raspberries. Plant once, harvest for years.
- Rhubarb — stays in one spot for a decade or more.
- Asparagus — permanent bed, produces for 15-20 years.
- Herbs — perennials like rosemary, thyme, and sage don’t move. Annual herbs (basil, coriander) can slot into any bed.
- Strawberries — technically should rotate on a 3-year cycle, but many gardeners keep them in a dedicated bed.
Common Rotation Mistakes
Forgetting That Tomatoes Are in the Same Family as Potatoes
Both are nightshades (Solanaceae). Growing tomatoes in the same bed as last year’s potatoes defeats the purpose — they share the same diseases, especially blight. If your greenhouse tomatoes stay in the same spot (common), grow outdoor potatoes as far from the greenhouse as possible.
Putting Turnips and Swede with Roots
They’re brassicas, not root vegetables. It’s confusing because they grow underground, but botanically they belong with cabbages and kale. Rotate them with brassicas to prevent clubroot.
Over-Complicating It
A three-year rotation works almost as well as four. A five-year rotation is even better but needs five beds. Don’t let perfect be the enemy of good — any rotation is better than none.
Starting in the Wrong Year
It doesn’t matter which group you start with. Pick whichever crops you’re most excited to grow this year, and build the rotation from there. There’s no “correct” starting point.
Adapting Rotation for Small Gardens
If you only have two or three beds, a simplified rotation still helps:
Two-Bed Rotation
- Bed A: Heavy feeders (brassicas, potatoes) one year → Light feeders (roots, legumes) the next
- Bed B: The opposite
Not as effective as four-bed rotation, but it still breaks disease cycles and balances nutrient demand.
Three-Bed Rotation
- Year 1: Legumes → Year 2: Brassicas → Year 3: Roots/Potatoes combined
- This works well for smaller allotments where four equal beds aren’t practical
Container Growing
Rotation is easier in containers because you replace the compost. Use fresh multipurpose compost each year and you don’t need to rotate at all — the diseases and pests live in the old soil, not the pot.
When to Break the Rules
Rotation is a guideline, not a law. There are times when breaking it makes sense:
- If you only grow three plant families — not everyone grows brassicas. Build a three-year rotation around what you actually grow.
- If your greenhouse is small — tomatoes, peppers, and cucumbers often stay in the same greenhouse bed because there’s nowhere else to put them. Replace the top 15cm of soil every 2-3 years instead.
- If one bed gets much more sun — some crops need the sunniest spot. It’s better to put tomatoes in the best sun even if it breaks rotation than to grow them in shade and follow the plan perfectly.
- If you discover a soil problem — clubroot in one bed? Don’t grow brassicas there regardless of the rotation. Practical reality overrides the plan.
Bottom Line
A four-year crop rotation — legumes, brassicas, roots, then potatoes — is the most effective way to keep your UK vegetable garden healthy and productive without chemicals. It prevents disease buildup, manages pests naturally, and keeps your soil balanced. Set up four beds, follow the sequence, and don’t overthink it.
The best part: once you’ve done it for one full cycle, it becomes automatic. You stop thinking about where things go and start thinking about what you want to harvest. And the harvests, year on year, get better rather than worse.
Frequently Asked Questions
How many beds do I need for crop rotation? Four beds is ideal for a full four-year rotation. Three beds work with a simplified plan. Even two beds alternating between heavy and light feeders is better than no rotation at all.
Does crop rotation work in raised beds? Yes. Four raised beds of any size can follow the same four-year rotation as a full allotment. The principles are identical — move plant families to a different bed each year.
What if I grow the same crop in the same spot for two years? One year won’t cause disaster, but disease risk increases each consecutive year. Clubroot, white rot, and carrot fly all get worse with repeated planting. Resume rotation as soon as possible.
Do I need to rotate herbs? Perennial herbs (rosemary, thyme, sage) stay permanently in one spot. Annual herbs like basil, coriander, and dill can slot into any bed without affecting the rotation — they don’t belong to the four main groups.
Should I rotate crops in a greenhouse? Ideally yes, but space constraints often make it impractical. If your tomatoes stay in the same greenhouse bed, replace the top 15cm of soil every 2-3 years and add fresh compost to reduce disease buildup.